
About the second year of my apprenticeship, I was given a Leatherman multi-tool; and I just loved the thing. They are super useful and there were countless times it saved me going back out to the truck. I had taken it back a number of times for repairs or replacement and had no dramas there either. All in all, in my experience, they’re a great tool; the pouches not so much. I originally had leather ones with a snap button which were fine, but these later became ballistics nylon; which I don’t particularly rate. I always found the Velcro would lose its adhesion and the knife would wear through the bottom of the pouch.

Yeah these fucking things
Everything came to a head one day when my cherished Leatherman ended up inside a sewage treatment plant I was working on. The Velcro flap came unstuck as I was crouching down above an open inspection hatch, and into the drink went the tool. I was all but helpless, squatting there, slack jawed. Only able to watch as the tool disappeared under the surface. And like that, it was gone. I’m sure if I ever had that tank pumped out and retrieved the tool, it would clean up and work just fine.


This chamber in the treatment plant is called the clarifier; and just to clarify, I was majorly pissed off about this.
I went for about two years tossing up whether to just bite the bullet and buy a new one or to wait until that treatment plant needed de-sludging; to try and recover & refurb the tool. Serendipity struck one day though, up on a roof. I was inspecting some skylights to be replaced and low and behold, an old pocket knife lay beside one; exposed to the elements. Whether accidentally forgotten or a similar incident to my own struck someone else; I was left with a useful, albeit tired, tool.
Finding the knife was also the high point of how that job went unfortunately.
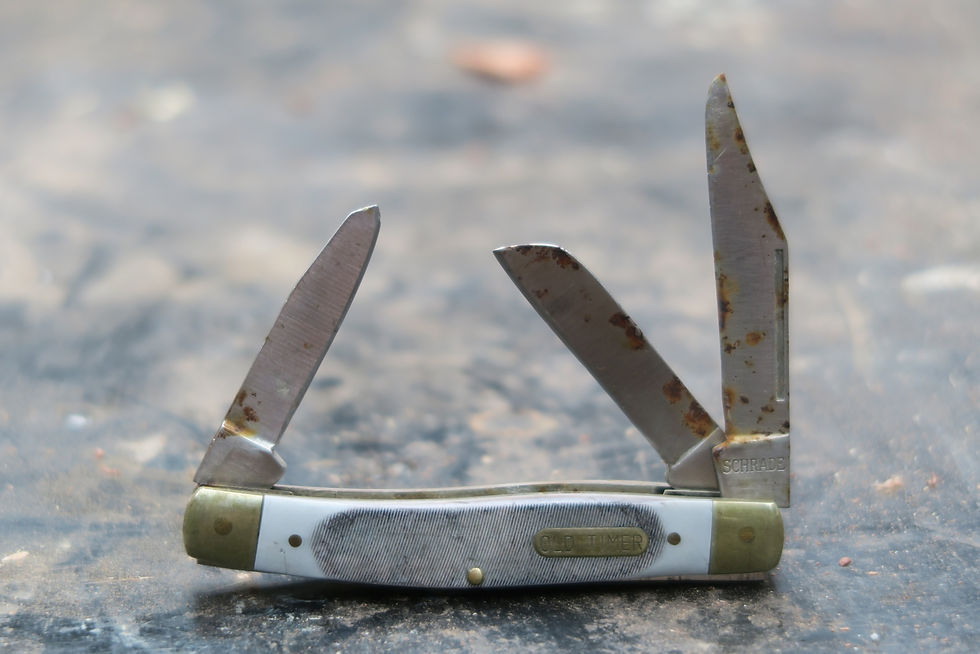
The knife is a little beat up. Surface rust on the blades, grime all over the handle and the brass elements are tarnished. Inspecting the particulars; this is a three-blade pocket knife comprised of spey (L), sheepsfoot (C), and clip point (R) blades, with a plastic handle inlay. The main body has a brass ‘Old Timer’ badge and the clip point is stamped Schrade 8OT. With something to chew on, a little bit of research was possible. Turns out, to my surprise, this was quite a storied brand and knife model; the ‘Old Timer Senior’. These were originally American made knifes until the Schrade company shut up shop after about a century of manufacturing. The trademarks were bought and manufacturing shipped overseas; which is where I’d wager this knife has come from.
From what I could find, the original US models were stamped USA and had carbon steel blades; for easier sharpening and better edge retention. This was probably the main reason they were revered as high-quality blades. I can’t say for how long this knife was exposed to the elements but would pick the blades as stainless steel. With the lack of USA stamp, stainless steel blades (rust included) and high resemblance to currently available stock; I’d say this is a Chinese made model.
So with a couple of interesting historical nuggets and a bit of personal backstory for this knife under my belt, I decided to fix it up and use it. First thing to do of course; avoid the fate that befell my Leatherman. As this turned out to be a mass-production knife, I went around town to see what pouches were available; and there wasn’t much. A lot of what the suppliers had, didn’t suit. Those that did, just weren't much chop. I ended up at a rural supplier with a local saddlemaker / leatherworker in store. Turns out he had just finished making a couple of belt pouches for this exact knife; I know right. He was pretty good value, and we spent a bit of time chin-wagging. I walked away with a buckled pouch and some leather scraps to make a sharpening strop.


Locally hand-made this pouch even had a horizontal belt loop; which I prefer.
The pouch is well sewn and is a snug fit for the knife. As far as treatment goes, it is only tanned with the exposed edges burnished. To increase its longevity, weatherproofness and promote a bit more suppleness I’m going to apply some Dubbin. This is a pretty traditional, medieval I think, leather treatment; consisting of wax, oils & tallow. There are numerous ways this can be applied but I’m just going to wipe over generously with a rag and burnish it off. For stiff small pieces or shoes etc, this works well. For thinner clothing or awkward items, the article and the Dubbin can be warmed up a little, in the sun or with a hair dryer, and thinly applied; in several coats if necessary. The surface gets a richer colour once applied and burnished. Do a test spot if you’re worried about appearance.


Wipe it on and let it soak for a while. After burnishing, the material will go from cloudy to a satin sheen; as seen right on pouch proper against belt loop.
Onto cleaning up the knife; first thing to tackle is the surface rust. Being that this is stainless steel, this rust will come off with a light application of elbow grease. Using some Camelia blade oil for lubricant, wet & dry abrasive works fine for this. In this instance, 400 grit to remove the rust and 600 grit for a little bit of polishing.
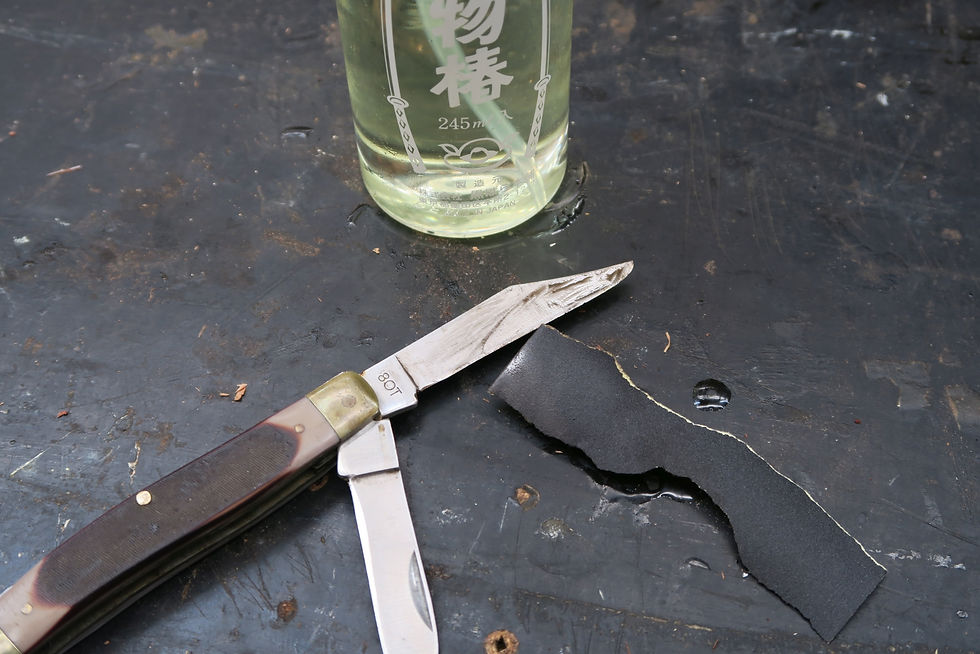
The blades all readily polished up
The very tip of the clip blade had been previously used as a lever for something and has been bent. While that’s a big no-no for any blade; I totally understand where the previous owner was coming from on this, and may also be guilty myself previously. A few love taps with a small hammer against a bench vice anvil corrects this. If you’re in the market for a bench vice make sure you get one with an anvil face integrated as part of the casting; you will thank yourself later.


Subtle but noticeable
The knife recess has some muck and surface rust in there that needs to be cleaned out. Instead of the camellia oil, a penetrating oil is a better choice here. The area is really cramped and it’d difficult to get tooling in, so to cut down on cleaning time, the penetrant will work best. Penetrating oils like WD40 etc are actually solvents; that’s how they affect penetration. Using it here will help lift the grime with minimal effort. This works well for cleaning lots of things really, especially any new cast iron machinery you may pick up. The exposed iron faces will normally be covered in cosmoline and wax paper. The wax paper will peel straight off but cosmoline is pretty sticky stuff. The penetrating oil will help dissolve it so that a rag will more easily wipe it off.
Anyways, using a small screwdriver for access, a swatch of wet & dry removes the rust and a rag cleans out the muck. A drop of light machine oil at the slip joints allows a nice smooth open/close action.


I can't overstate how much of a difference just oiling your tools regularly makes
Onto the faces of the handle. The brass is easy, a light sanding with the wet & dry brings back the sheen then a quick polish with some Brasso gets the bright shine back. A little bit more work is needed on the handle knurling though. It’s gummed up with what is probably a mix of sweat, dust and skin. This is removed with a coarse scotch-brite pad scouring with the direction of the knurling for both sides. Took a couple of minutes but scrubbed up pretty good I’d say.


Sparkle. Sparkle.
Lastly onto sharpening. These blades had been touched up previously; probably against a linisher or belt sander I’d guess. They weren’t terrible but they weren’t real good either. Each blade is brought back using progressively finer whetstones to re-establish and hone the cutting edge. I’m no expert knife sharpener so take this advice with a grain of salt. I like to set the knife at a low angle with both hands and hold that position firmly, but not rigidly, with my elbows and upper body. Then slowly rocking back and forwards with my core and applying light pressure onto the stones. Follow this for each edge of the bevel on each knife of each grit. Once they’re all finished, polish them on a flexible strop.


Here's one I prepared earlier; which worked great on debut.
Each blade is now razor sharp. Now there are myriad ways for testing the degree of sharpness of an edge. For chisels, planes and workshop tools I like to take a shaving of hair from my forearm to prove the sharpness. For knives I prefer the tomato test. The skin of the tomato fruit is comparatively tough; so it takes a really sharp blade to part with minimal effort. This is a simple and easy test; just make sure you don’t waste the tomato. Hold the tomato and make a cut with the knife to establish a flat face. Sit the tomato onto this face and without any touching, pass the knife through to take another slice. For mine, if the slice can be made with minimal movement of the tomato; the test is passed.
While botanically a fruit; if it doesn't go with ice-cream, it's just not a fruit.
The blade was a little bit short for the test, but got through OK. After cutting something acidic like tomatoes rinse the blade under water and re-apply some blade oil. The stainless steel won’t tarnish from the acid but the cutting edge will be dulled much faster if left without cleaning. For our kitchen, I keep a little jam jar stuffed with a rag soaked in camelia oil to keep the good knives in good shape. Just wipe them across and they’re ready to store.
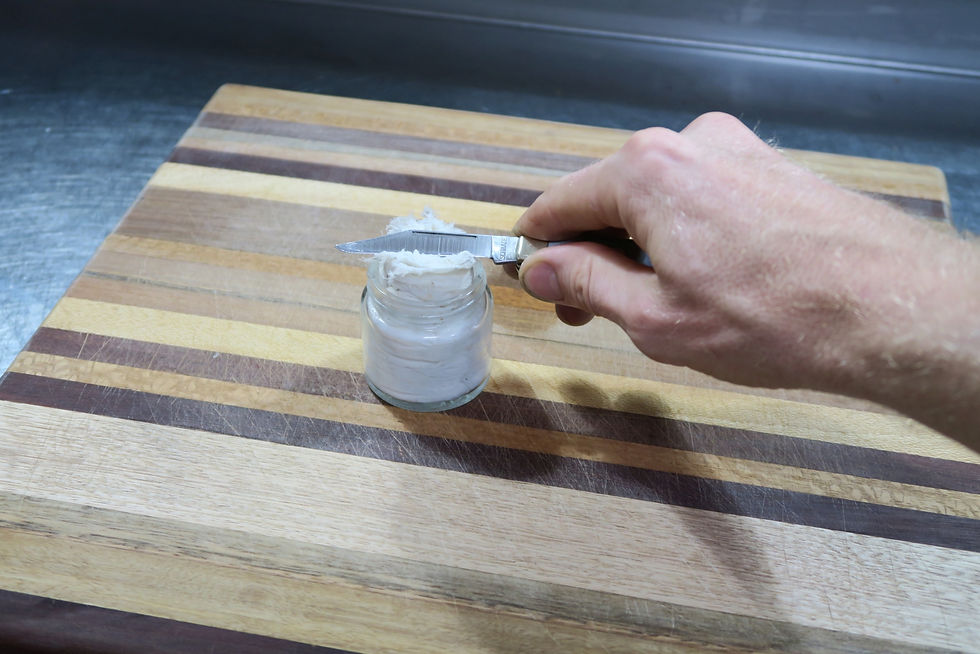
Really handy; I'd recommend one for every kitchen.
All told, I really don’t mind that this is a mass-production knife. It may not be as functional as a Leatherman but it feels comfortable in the hand and has more blades than I’ll require. It also makes for such a better story than “I went to the shop and bought a new knife & pouch”. Maintained properly, this knife should end up lasting well until I’m an Old Timer.
Kind Regards
Walker
March 2021
If you enjoyed this article why not stay up to date with all the latest from Timber Tone. Click here to subscribe so you never miss a post or video.
Comments